
Creating "interactive" reports
Interactive templates prompt for additional information before they can generate a report. When an interactive template is evaluated it will prompt for the missing parameters using a form. This tutorial describes the additional steps required to create an Interactive report. You should first be familiar with the basic steps of creating and installing templates for scheduled reports before proceeding (see Creating your own reports).
Interactive templates are useful when you want to create a standard report that may be replicated many times. For example, you may have a set of charts that you would like to plot for each of your web servers. An interactive report allows you to specify the set of charts you want, but be prompted for the specific web server when the template is evaluated. This allows you to easily create a report on demand for any web server. It also allows you to quickly schedule periodic reports for web servers that you wish to continually monitor.
It is the use of the ask directive in the report template that makes it interactive. Figure 1 shows an interactive template for identifying the top clients of a web server.
<inmon>
action=ask;
askCategory=Host;
askName=Web Server;
askDescription=Characterize traffic to a web server;
askTitle=Web Server Report;
serverAddress.default=www.inmon.com;
serverAddress.prompt=Enter the name of web server;
serverAddress.required=YES;
description.prompt=Enter a description of the web server;
date.default=yesterday;
date.prompt=Enter time interval;
date.options=today,yesterday,thisWeek,lastWeek;
date.required=YES;
</inmon>

<inmon>
action=index;
category=Web Servers;
name=$serverAddress;
</inmon>

<html>
<head>
<title>Clients of <inmon>action=print; variable=serverAddress</inmon></title>
</head>
<body>
<h1>Clients of <inmon>action=print; variable=serverAddress</inmon></h1>
<p><b>[<inmon>action=date; format=range</inmon>]</b></p>
<p><inmon>action=print; variable=description;</inmon></p>

<inmon>
action=report;
reportName=TopN;
reportFormat=chart;
tableType=TCP;
serverPort=80;
categoryColumn=serverName;
valueColumn=bytes;
resultTruncate=20;
includeData=yes
</inmon>


</body>

</html>
Figure 1 Profile a web server template file
The reporting directives in the template are highlighted in blue (see Help : Reports : Templates : Parameters for a detailed description of each parameter). All the black text is regular html.
You can create this template using any text editor (e.g. notepad on Windows). Save the file on your PC, as webserver.txt say, and then use the Upload new report template function in the Server > Reports form to install the template.
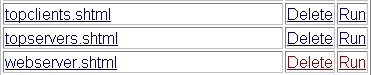 Figure 2 Run a report
The template webserver.shtml will appear in the Interactive templates table (see Figure 2). In order to test the report template, click on the Run link.
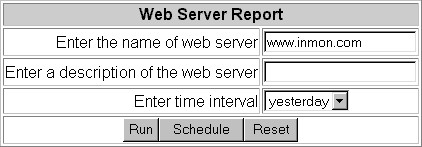 Figure 3 Prompt for server name
The form shown in Figure 3 prompts for the information specified in the template. The values of askTitle, <parameter>.default, <parameter>.prompt and <parameter>.options determine the fields in this form (see Figure 1).
Enter the name of a web server and its description and then click on the Run button. A report showing the top clients of the specified server will be generated (see Figure 4).
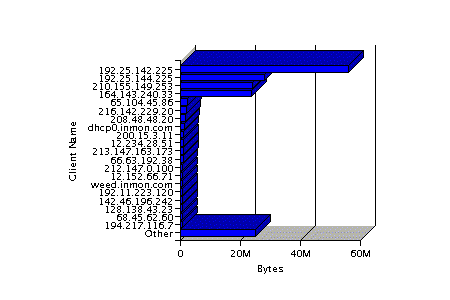 Figure 4 Clients of web server report [01-Apr-2003 00:00 to 02-Apr-2003 00:00]
If you want to schedule this report to run every day, simply click on the Schedule button instead of the Run button. A new Interactive template will appear in the Interactive templates list (see Figure 5) and the report run during each scheduled reporting period.
 Figure 5 Scheduling the report
Now that the Interactive template has been installed, this report will also be available via the Reports>Interactive menu (shown in Figure 6). The values of askCategory, askName and askDescription determine in the template (see Figure 1) determine how the interactive report will be listed.
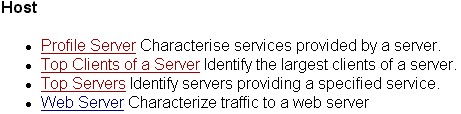 Figure 6 Reports>Interactive list
Clicking on the Web Server link in this list will prompt for information and allow the report to be Run (see Figure 3). However, the Schedule button is not available since reports may only be scheduled by the administorator.
| Related Topics |
|